Moving Beyond the Conventional Wireless Network with UniFi Mesh

Written by Andrew Pieper on the Ubiquiti Blog: https://goo.gl/91rE9i
We recently began shipping our newest product line of UniFi access points, the UniFi AC Mesh. Our UniFi AC Mesh line includes two models: the base UniFi AC Mesh (UAP-AC-M) and the UniFi AC Mesh Pro (UAP-AC-M-PRO). These access points offer benefits consistent with the rest of the UniFi AC products, but also add some new features that can help administrators better meet their network’s needs.
In this post, I’ll explain in greater detail how these new Mesh APs work and show how easy it is to deploy your own Mesh network.
Why Mesh?
As demand for internet connectivity has grown exponentially- and with it the portability of client devices- it’s become normal to expect better internet in more places. These expectations have extended past what we used to think was reasonable, to places and devices that ethernet cables or routers couldn’t viably reach. This is where Wireless Mesh Networks come in.
A Wireless Mesh Network uses a number of wireless Access Points/Radios which communicate with each other wirelessly to extend and provide internet access to clients throughout a physical site. This works contrary to traditional wireless networks which attempted to provide internet connectivity through a smaller number of wired gateways/routers.
Wireless Mesh Networks offer a way to get around the limitations of traditional networks and allow internet access across almost any environment. Using a mesh network can help you address challenges like a poorly placed cement wall or service demand in an outdoor venue.
Our UniFi Mesh product line enables network administrators to capitalize on this technology, deploy wireless further and more flexibly and all through the same UniFi Management platform.
AC Mesh Models & Features
The Mesh and Mesh Pro differ greatly in form from each other as well as our other AC APs- and with that comes some distinct advantages. Let’s take a look at what each has to offer:
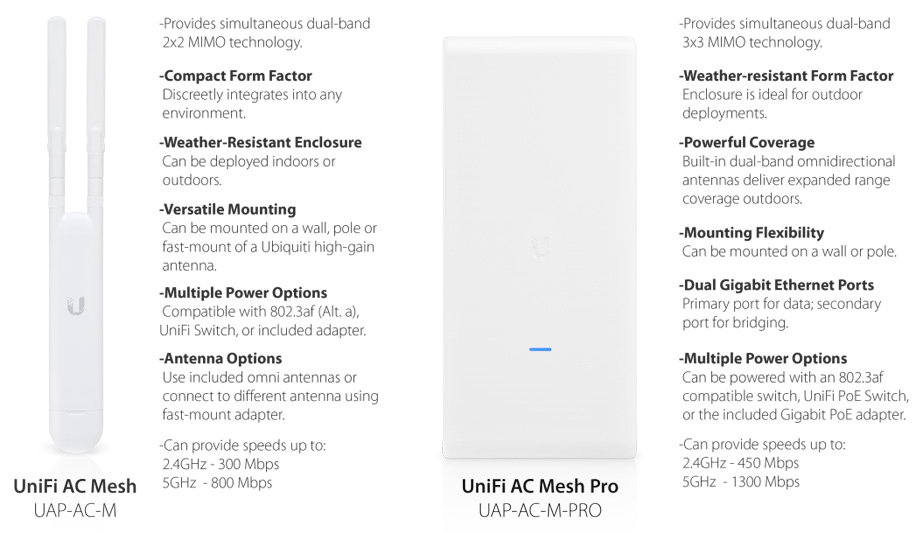
Both devices can be used in different ways to help you build a strong network in even the most unique deployment conditions.
As noted in the above graphic, the UAP-AC-M is the first UniFi AC access point to support alternative antenna options. This can be extremely useful in that it opens up a huge range of potential applications.
On the other hand, our beefier UAP-AC-M-PRO model is ideal for outdoor UniFi deployments that need to serve a larger number of client devices per AP and also offers more throughput than the UAP-AC-M.
Both devices however offer one critical benefit over existing UniFi APs which helps lend them their name- they enable you to build a multi-hop Wireless Mesh network. This is done by utilizing and adding greater functionality to an existing UniFi feature, Wireless Uplink.
Wireless Uplink & UniFi Mesh
UniFi introduced Wireless Uplink to help make wireless deployments more flexible and convenient for network administrators. Wireless Uplink allows any supported access point (see compatibility info here) with a wired data connection to act as a Base Station/Uplink AP for up to four other access points on a single band.
Factory default or unadopted access points can once powered up via POE, connect to an AP in range and make themselves available for adoption within the UniFi controller. These APs can then be adopted and configured in the controller via the Wireless Uplink connection. Once configured, the wireless access points can broadcast SSIDs and relay network traffic to and from client devices through the uplinked AP.
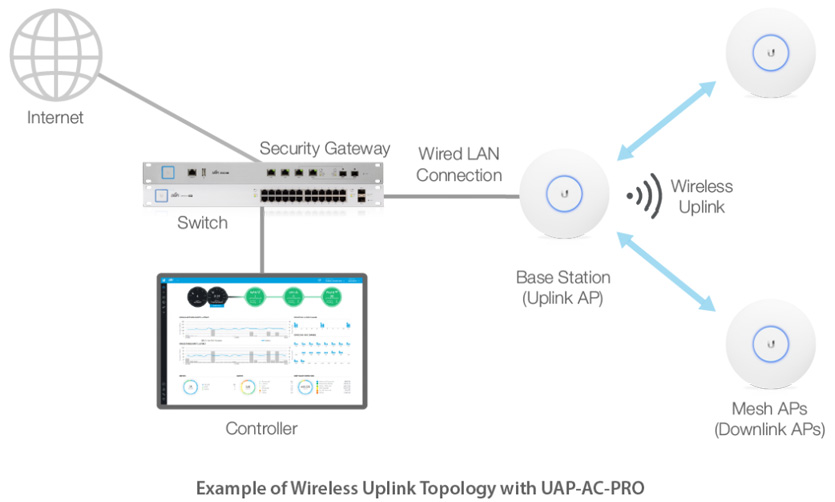
The UniFi Mesh access points add to what previous UniFI APs could do with Wireless Uplink- by enabling wirelessly downlinked Mesh APs to also act as an uplink to other access points. This means your Wireless Uplink setup can be as complex as is needed to best meet your Mesh network’s needs. The following example shows how Wireless Uplink topologies have evolved with UniFi Mesh:
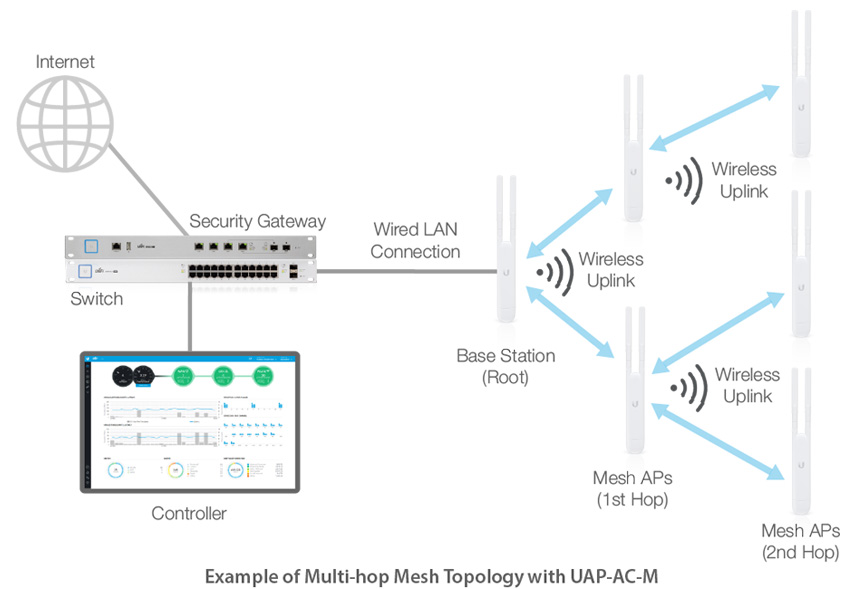
A multi-hop UniFi Mesh network allows your Wireless Uplink configuration to reach as far as is needed without wired connections to help get internet to those less accessible locations in your network.
Enabling Wireless Uplink/Deploying Mesh
Configuring Wireless Uplink & setting up a mesh network is pretty straightforward, to do so you’ll first want to enable Wireless Uplink:
- Open your UniFi Controller
- Go to Settings > Site
- Verify “Connectivity Uplink Monitor & Wireless Uplink” is enabled.
If not, check the box, then click Apply Changes.
Once the setting is enabled you’re ready to start deploying your mesh network.
- Setup and configure your wired AP to belong to the WLAN you want the rest of your devices to belong to- this must be done to ensure the device is broadcasting and can be uplinked to from the non-wired AP.
- Power up the access point that will be communicating with Base Station/root AP via Wireless Uplink and ensure it is within range of the Base Station/root AP. You will need a source of PoE to power the device without a wired data connection.
- After device boots up, it will appear within the Devices page of your controller, with the status Pending Adoption (Wireless).
- Click Adopt to adopt the device.
Once adoption has begun, the Base Station will provision, then again show as connected. After this, the Mesh AP device status will change with each step of the process:
- Adopting
- Provisioning
- And when finished, Online (Wireless).
Note: This process will take longer than a wired adoption- roughly 2-5 minutes before the device will show up as adopted within your controller.
Once you’ve finished adopting the device you can manage these devices within the controller the same manner as a wired AP.
To setup a Multi-hop Wireless Uplink network, you’ll need to repeat this step each time for every device you want to add to your mesh topology. Once all Mesh devices have been adopted, you can modify/adjust your APs to use a different Uplink AP. This can be easily done through the UniFi Device configuration:
- Open your UniFi Controller.
- Click on the Device in your Wireless Uplink setup that you’d like to configure.
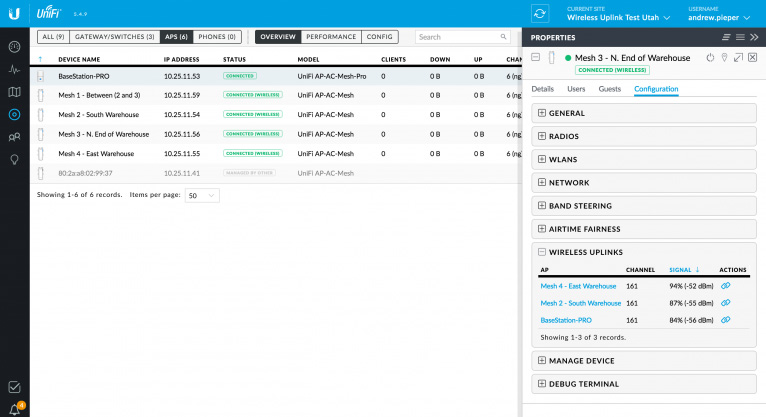
- Click on the Configuration Tab in the Device Pane.
- Select “Wireless Uplinks”
Once in this menu you can choose a different device to act as the Uplink. To do so: Select the desired AP to act as uplink, and click the link icon.
To remove the existing uplink: Click the trash icon next to the link you’d like to remove. The device will then reprovision and will no longer use the selected AP as uplink.
Enable Automatic Failover
To improve our mesh functionality- we recently introduced a new feature called “Enable Automatic Failover”(You’ll need to upgrade to 5.4.9 or greater to enjoy this feature). Automatic Failover allows your UniFi APs to stay connected in case an AP from your Wireless Uplink topology goes offline. If this occurs, with Automatic Failover enabled, devices/APs are able to adjust and find another AP within range to act as uplink.
To enable this feature:
- Go to Site > Settings
- Under Uplink Connectivity Monitor & Wireless Uplink, click the box “Enable Automatic Uplink Failover”

Devices will need to reprovision frequently while setting up your Wireless Uplink topology, so to avoid devices rolling over to the next available AP and throwing off your designed topology, I’d recommend disabling this feature until you’ve got your mesh network fully configured.
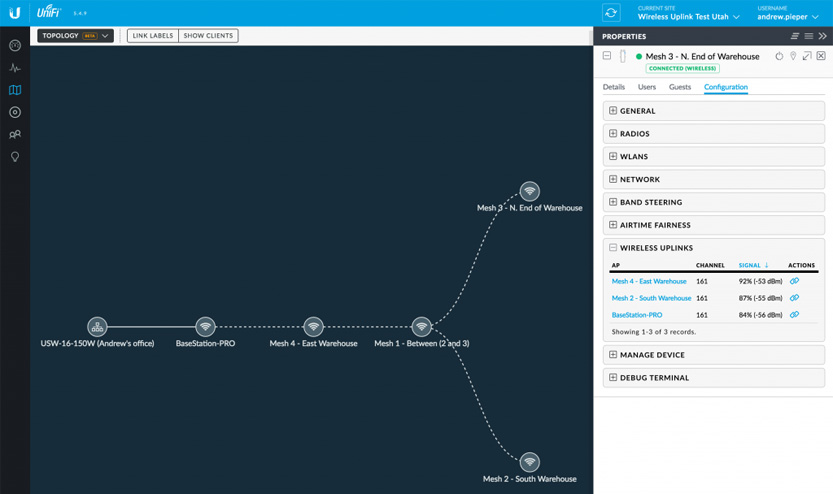
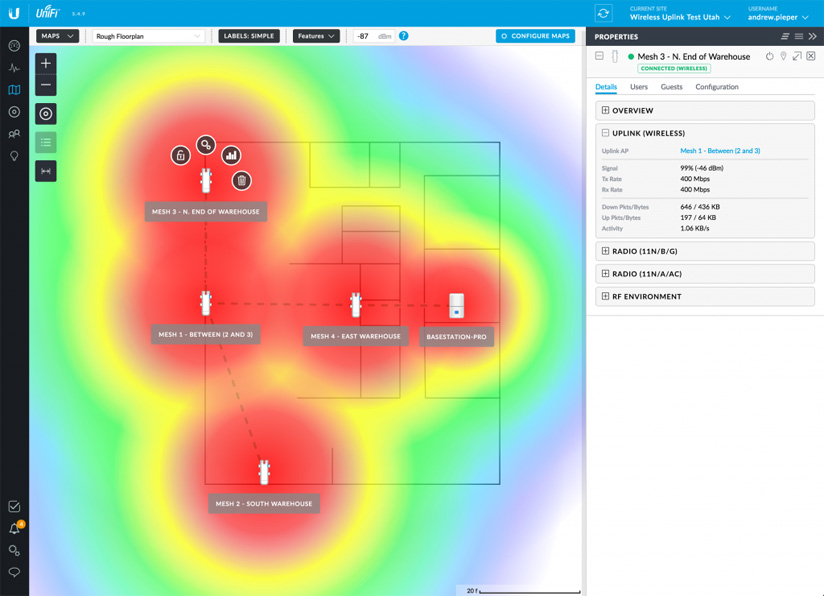
Topology/Map View
In deploying my own Mesh network I found that the Map and Topology (Beta) views were extremely helpful in managing a multi-hop mesh topology. It can be hard to remember which device is where, and to know which device you want uplinked to what device. On numerous occasions having a visual reference saved me a lot of time and difficulty.
To see both of these views, click the Map icon in your controller and select from the type of map from the top-left dropdown box. What’s particularly helpful about these views is that you can configure devices through these interfaces- by clicking on the devices themselves.
I’d recommend uploading a floorplan of where you’ll be deploying your mesh network- as this was vital in helping me keep devices straight.
Best Practices & Considerations
While the advantages are clear- there are a number of factors that should be considered when looking at deploying a mesh network or using Wireless Uplink.
Wireless Uplink requires all interconnected APs to communicate and broadcast over the same channels. Due to this, it’s not recommended to deploy a mesh network in places where a more-conventional UniFi network is viable. It’s best to use Wireless Uplink when you need to extend network access to less accessible physical locations within the network or where wired connections are not available.
Also, to ensure that network speeds are optimized when using UniFi Mesh with Wireless Uplink, we recommend effort taken to balance Wireless Uplink load from wired APs as to not create unnecessary delays on any devices connected via the overused AP. See example below:
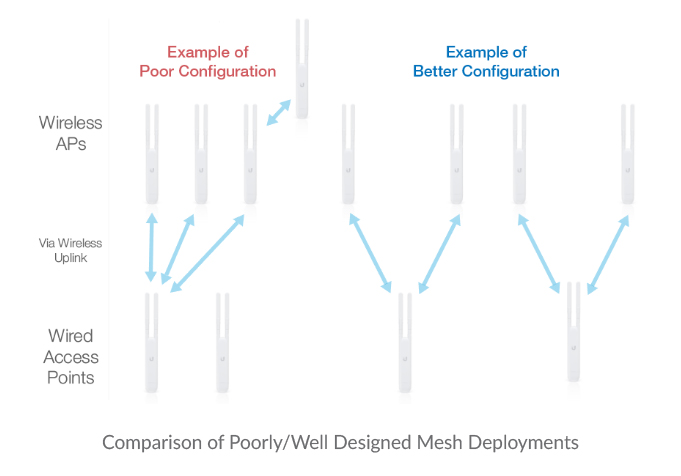
The example on the left does not balance the load between the two UAP-AC-M and is unnecessarily burdening the one AP, when the other could also be used as a wired base station. Also, the first example on the left added an unnecessary level of Wireless Uplink- while the example on the right eliminated this.
Unless your network needs to use Wireless Uplink or benefits from the use of this feature or the Connectivity Uplink Monitor, we recommend you disable the Connectivity Uplink Monitor & Wireless Uplink setting. To do so, in your UniFi Controller:
- Click Settings icon.
- Go to Site Settings.
- Uncheck the box next to “Enable connectivity monitor and wireless uplink.

Disabling this setting can offer some improved speed and is often suggested when network speeds with UniFi are less than ideal.
Conclusion
While mesh networks may not be necessary in every environment- having the Mesh product and Wireless Uplink in your arsenal can help prepare you for a variety of situations that may arise. Give it a try in your own network!
Related Posts

UniFi - The Beginning of The Higher Market Disruption
Read the latest Blog from Ubiquiti CEO Robert Pera, about how an outdoor wireless company entered th..

UniFi Mobile App & New Features
Introducing the UniFi mobile application, making management of your UniFi access points even easier!..